What is UTM?
UTM parameters added to the URL address allow you to track the effectiveness of online campaigns and track visits, for example, with Google Analytics.
- To learn more about UTM parameters, read our article UTMs & Landing Pages.
- Also, check our guide on passing UTMs to another URL after a button click.
How to collect standard UTM parameters?
All standard UTM parameters from your landing page’s URL address are automatically collected and added to your lead.
Example:
If the visitor enters your landing page with an exemplary URL: http://www.mylandingpage.com/hello/?utm_source=facebook.com&utm_medium=social&utm_campaign=winter_sale,
after submitting the form, the final lead will look like this:
email: (visitor’s mail)
utm_source: facebook.com
utm_medium: social
utm_campaign: winter_sale
Passing UTMs to external tools (integrations)
If you want to pass UTM parameters to an external integration, you have to treat them as non-standard UTM parameters and create hidden fields for them – see the step below.
How to collect non-standard UTM parameters?
If you use custom parameters that you want to pass to the lead, you will need hidden fields in the form and additional JavaScript code.
1. Log in to your Landingi account and go to the editor of your landing page.
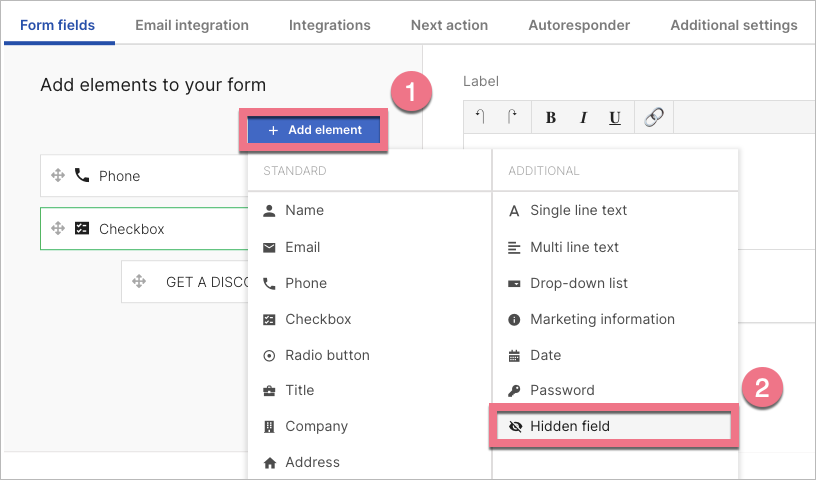
2. Navigate to the Form Settings. In the Form fields tab, click Add element (1) and add Hidden fields (2) to it that match your custom UTM parameters – one for each parameter.

3. Click Show name attribute and enter a custom parameter.

Example:
If your landing page URL with custom parameters is: https://www.landpage.co/utm/?ref=website&name=Gilbert, in the Field value of the name attribute field, add ‘ref’ and ‘name’ respectively.
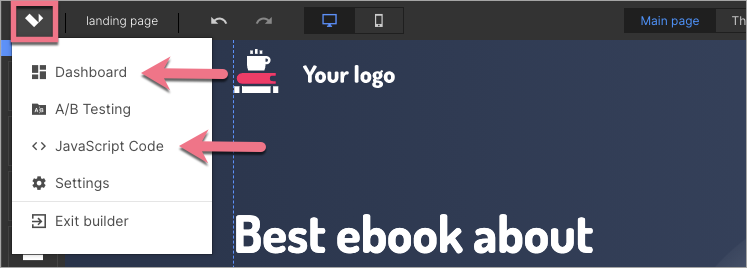
4. Enter the Dashboard of your landing page, go to the JavaScript Codes tab and click on Add script. You can enter the JavaScript Codes tab directly from the editor.

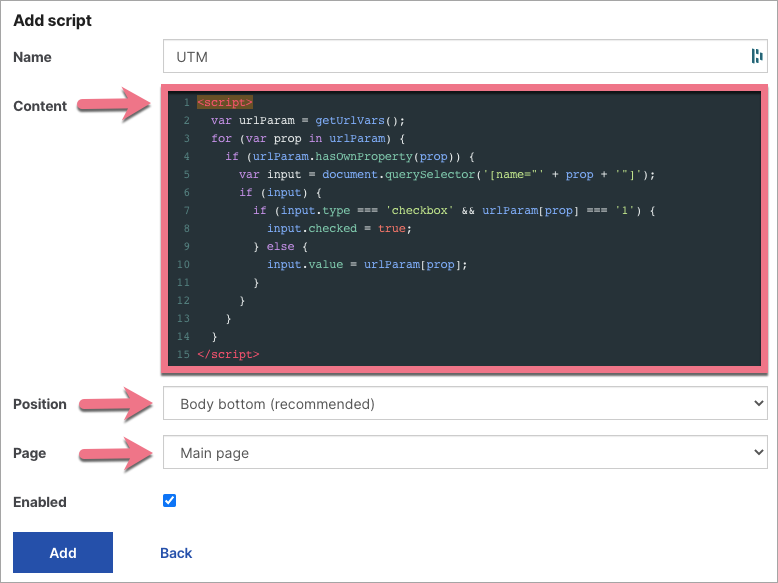
5. Paste the script indicated below in the Body bottom position on the Main page. Click Add to save the changes. More about adding your own scripts you will find in the manual Your own JavaScript.
<script>
  var urlParam = getUrlVars();
  for (var prop in urlParam) {
    if (urlParam.hasOwnProperty(prop)) {
      var input = document.querySelector('[name="' + prop + '"]');
      if (input) {
        if (input.type === 'checkbox' & urlParam[prop] === '1') {
          input.checked = true;
        } else {
          input.value = urlParam[prop];
        }
      }
    }
  }
</script>

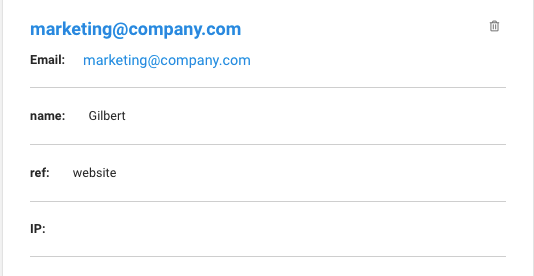
The target lead will look like this:

A hidden field with the ‘name’ attribute captures the name parameter, while a hidden field with the ‘ref’ attribute captures the ref parameter.
How to pass UTM parameters from one landing page to another and fill the form automatically?
You can send UTM parameters from one form on a landing page to another so that the data entered by the user on the first landing page will be auto-filled on the next one.
See an example application below:

Step I – on the first landing page
1. Log in to the platform and navigate to the Dashboard of the landing page from which you want to send the parameters, and then go to the JavaScript Codes tab and click Add script.
2. Paste the code indicated below in the Body bottom position on the Conversion page and click Add to save the changes. More about adding your own scripts you will find in the manual Your own JavaScript.
<script>
	var out = [];
delete conversion.hash;
for (var key in conversion) {
	if (conversion.hasOwnProperty(key)) {
		out.push(key + '=' + conversion[key]);
	}
}
location.href = 'https://www.example.com' + '?' + out.join('&'); </script>
Replace example.com with the URL address of your next target landing page, where your visitor should be redirected after submitting the form.
Step II – on the target landing page
1. Enter the Dashboard of the landing page where you want to send the UTM parameters, then go to the JavaScript Codes tab and click Add script.
2. Paste the code indicated below (for non-standard UTM parameters) in the Body bottom position on the Main page of your landing page and click Add to save the changes.
<script>
	var urlParam = getUrlVars();
for (var prop in urlParam) {
	if (urlParam.hasOwnProperty(prop)) {
		var input = document.querySelector('[name="' + prop + '"]');
		if (input) {
			if (input.type === 'checkbox' & urlParam[prop] === '1') {
				input.checked = true;
			} else {
				input.value = urlParam[prop];
			}
		}
	}
} </script>
From now on, the data entered in the form on the first landing page will be forwarded to the URL address of the next landing page and will be auto-filled in the form.